- 了解SpringBoot Starter相关概念以及开发流程
- 实现自定义SpringBoot Starter(全局加解密)
最终引用的效果:
<dependency>
    <groupId>com.xbhoggroupId>
    <artifactId>globalValidation-spring-boot-starterartifactId>
    <version>1.0.0version>
dependency>
开源地址
https://gitee.com/xbhog/encry-adecry-spring-boot-starter
基于 Spring Boot + MyBatis Plus + Vue & Element 实现的后台管理系统 + 用户小程序,支持 RBAC 动态权限、多租户、数据权限、工作流、三方登录、支付、短信、商城等功能
- 项目地址:https://github.com/YunaiV/ruoyi-vue-pro
- 视频教程:https://doc.iocoder.cn/video/
SpringBoot Starter作用将一组相关的依赖打包,简化项目的配置和初始化过程,通过特定的Starter开发者可以快速的实现特定功能模块的开发和扩展。
自定义Starter能够促进团队内部资源的复用,保持项目间的一致性,提升协作效率并且有助于构建稳定、高效的大型系统。
注入SpringBoot的方式
在刚开始开发Starter的时候,首先考虑的是怎么能注入到SpringBoot中?
这部分涉及到部分SpringBoot的自动装配原理,不太清楚的朋友可以补习下;
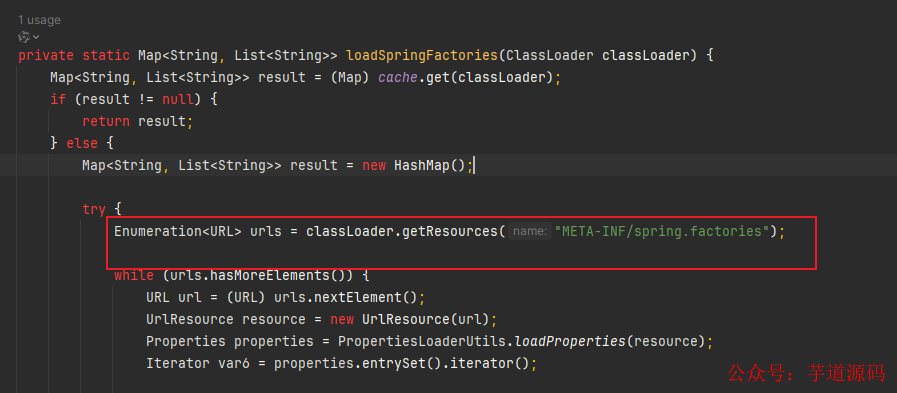
注入SpringBoot需要配置文件,在项目中的resources资源目录中创建该目录和文件。
demo-spring-boot-starter
└── src
    └── main
        └── java
            └── com.xbhog
                ├── DemoBean.java
                └── DemoBeanConfig.java
        └── resources
                └── META-INF
                    └── spring.factories
在spring.factories中我们指定一下自动装配的配置类,格式如下:
org.springframework.boot.autoconfigure.EnableAutoConfiguration=com.xbhog.DemoBeanConfig
@Slf4j
@Configuration
public class DemoBeanConfig {

    @Bean
    public DemoBean getDemo() {
        log.info("已经触发了配置类,正在初始化DemoBean...");
        return new DemoBean();
    }
}
@Slf4j
public class DemoBean {
    public void getDemo(){
      log.info("方法调用成功");
    }
}
这样就可以将设置的包扫描路径下的相关操作打包到SpringBoot 中。
SpringBoot主类启动器:初始化的操作,感兴趣的朋友可以研究下

完成后,我们可以打包该项目,然后在测试工程红进行Maven的引入、测试。
测试
新建Spring 测试工程,引入依赖:
    com.xbhog
    demo-spring-boot-starter
    1.0

@RestController
public class BasicController implements ApplicationContextAware {
    private ApplicationContext applicationContext;

    /**两种引入方式都可以
    @Autowired
    private DemoBean demoBean;*/

    @GetMapping("/configTest")
    public void configTest() {
        DemoBean demoBean = applicationContext.getBean(DemoBean.class);
        demoBean.getDemo();
    }

    @Override
    public void setApplicationContext(ApplicationContext applicationContext) throws BeansException {
        this.applicationContext = applicationContext;
    }
}
请求地址后,可以观察控制台,如下日志表示SpringBoot Starter可以使用了。
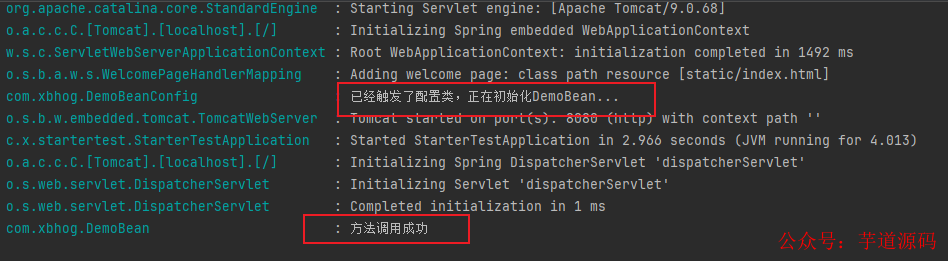
到此,一个简单的Starter开发完成了,后续可以围绕工程,根据需求和业务,对通用功能(接口操作日志、异常、加解密、白名单等)进行封装,最后打到Maven仓库中进行使用。
基于 Spring Cloud Alibaba + Gateway + Nacos + RocketMQ + Vue & Element 实现的后台管理系统 + 用户小程序,支持 RBAC 动态权限、多租户、数据权限、工作流、三方登录、支付、短信、商城等功能
- 项目地址:https://github.com/YunaiV/yudao-cloud
- 视频教程:https://doc.iocoder.cn/video/
在之前金融系统开发中,需要对接多个第三方的服务且数据安全性要求比较高;在接口评审阶段需要双方在数据传输的时候进行接口加解密;起初在第一个服务对接的时候,将相关的加解密操作写到工具类中;随着后续服务的增多,代码的侵入越来越严重。
选择通过Starter进行功能的封装;好处:引用方便,开发迭代方便,团队复用度高且对业务没有侵入。
思路:通过配置文件初始化,让配置类注解@ComponentScan扫描到的Bean等注入到SpringBoot中,通过自定义注解和RequestBodyAdvice/ResponseBodyAdvice组合拦截请求,在BeforBodyRead/beforeBodyWrite中进行数据的前置处理,解密后映射到接口接收的字段或对象。
接口上的操作有两种方式:
- 注解+
RequestBodyAdvice/ResponseBodyAdvice
这里我选择的第二种的RequestBodyAdvice/ResponseBodyAdvice,抛砖引玉一下。
【注】第二种存在的局限性是:只能针对POST请求中的Body数据处理,无法针对GET请求进行处理。
项目结构:
encryAdecry-spring-boot-starter
└── src
    └── main
        └── java
            └── com.xbhog
                ├── advice
                │   ├──ResponseBodyEncryptAdvice.java
                │   └──RequestBodyDecryptAdvice.java
                ├── annotation
                │   └──SecuritySupport
                ├── handler
                │    ├──impl
                │    │   └──SecurityHandlerImpl.java
                │    └──SecurityHandler
                └── holder
                │    ├──ContextHolder.java
                │    ├──EncryAdecryHolder.java
                │    └──SpringContextHolder.java
                └──GlobalConfig.java
        └── resources
                └── META-INF
                    └── spring.factories
项目处理流程图:

核心代码:
@Override
public HttpInputMessage beforeBodyRead(HttpInputMessage inputMessage, MethodParameter parameter, Type targetType, Class extends HttpMessageConverter>> converterType) throws IOException {
    log.info("进入【RequestBodyDecryptAdvice】beforeBodyRead的操作,方法:{}",parameter.getMethod());
    SecuritySupport securitySupport = parameter.getMethodAnnotation(SecuritySupport.class);
    assert securitySupport != null;
    ContextHolder.setCryptHolder(securitySupport.securityHandler());
    String original = IOUtils.toString(inputMessage.getBody(), Charset.defaultCharset());
    //todo
    log.info("该流水已插入当前请求流水表");
    String handler = securitySupport.securityHandler();
    String plainText = original;
    if(StringUtils.isNotBlank(handler)){
        SecurityHandler securityHandler = SpringContextHolder.getBean(handler, SecurityHandler.class);
        plainText = securityHandler.decrypt(original);
    }
    return new MappingJacksonInputMessage(IOUtils.toInputStream(plainText, Charset.defaultCharset()), inputMessage.getHeaders());
}
@Override
public Object beforeBodyWrite(Object body, MethodParameter returnType, MediaType selectedContentType, Class selectedConverterType, ServerHttpRequest request, ServerHttpResponse response) {
    log.info("进入【ResponseBodyEncryptAdvice】beforeBodyWrite的操作,方法:{}",returnType.getMethod());
    String cryptHandler = ContextHolder.getCryptHandler();
    SecurityHandler securityHandler = SpringContextHolder.getBean(cryptHandler, SecurityHandler.class);
    assert body != null;
    return securityHandler.encrypt(body.toString());
}
该Starter中的全局加解密默认采用的国密非对称加密SM2,在开发过程中遇到了该问题InvalidCipherTextException: invalid cipher text
【原因】 私钥和公钥值不是成对存在的,每次调用SmUtil.sm2()
会生成不同的随机密钥对。
【解决】在该Starter中采用@PostConstruct修饰方法,在项目运行中只会初始化运行一次该方法,保证了SmUtil.sm2()只会调用一次,不会生成不同的随机秘钥对。
【ISSUES#1890】详细请看该地址:https://hub.fgit.cf/dromara/hutool/issues/1890
@Slf4j
@Component
public class EncryAdecryHolder {
    public static SM2 sm2 = null;
    @PostConstruct
    public void encryHolder(){
        KeyPair pair = SecureUtil.generateKeyPair("SM2");
        byte[] privateKey = pair.getPrivate().getEncoded();
        byte[] publicKey = pair.getPublic().getEncoded();
        log.info("生成的公钥:{}",publicKey);
        log.info("生成的私钥:{}",privateKey);
        sm2= SmUtil.sm2(privateKey, publicKey);
    }
}
除了默认的加密方式,还可以通过SecurityHandler接口进行扩展,扩展出来的impl可以在@SecuritySupport(securityHandler="xxxxxx")中指定。
@Target(ElementType.METHOD)
@Retention(RetentionPolicy.RUNTIME)
public @interface SecuritySupport {
    /*securityHandlerImpl*/
    String securityHandler() default "securityHandlerImpl";

    String exceptionResponse() default "";

}
复用之前的测试项目,引用打包的mavne依赖:
<dependency>
    <groupId>com.xbhoggroupId>
    <artifactId>encryAdecry-spring-boot-starterartifactId>
    <version>1.0.0version>
dependency>
启动项目,初始化公私钥。


测试接口代码如下:
@Slf4j
@RestController
public class BasicController implements ApplicationContextAware {
@Resource(name = "demoSecurityHandlerImpl")
private SecurityHandler encryAdecry;
private ApplicationContext applicationContext;
// http://127.0.0.1:8080/hello?name=lisi
//@SecuritySupport(securityHandler = "demoSecurityHandlerImpl")
@SecuritySupport
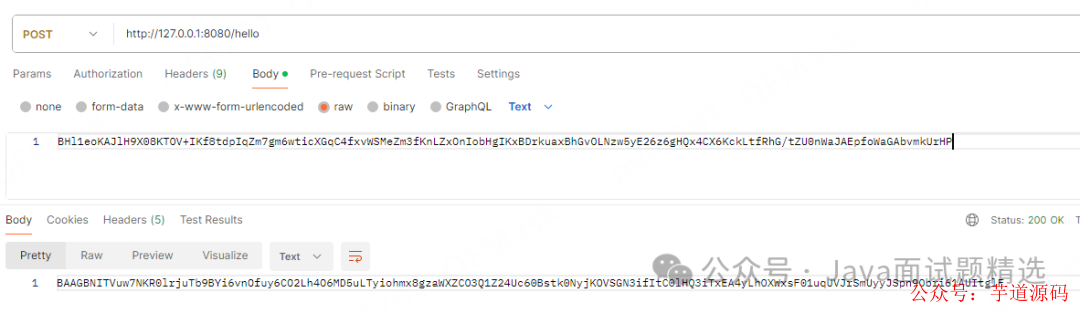
@PostMapping("/hello")
public String hello(@RequestBody String name) {
return "Hello " + name;
}
@GetMapping("/configTest")
public String configTest(@RequestParam("name") String name) {
/*DemoBean demoBean = applicationContext.getBean(DemoBean.class);
demoBean.getDemo();*/
return encryAdecry.encrypt(name);
//return MD5.create().digestHex16(name);
}
}
优化后的项目结构:
encryAdecry-spring-boot-starter
└── src
    └── main
        └── java
            └── com.xbhog
                ├── advice
                │   ├──ResponseBodyEncryptAdvice.java
                │   └──RequestBodyDecryptAdvice.java
                ├── annotation
                │   └──SecuritySupport
                ├── handler
                │    ├──impl
                │    │   └──EncryAdecryImpl.java
                │    └──SecurityHandler
                └── holder
                │    ├──ContextHolder.java
                │    └──SpringContextHolder.java
                ├──GlobalProperties.java
                └──GlobalConfig.java
        └── resources
                └── META-INF
                    └── spring.factories
增加配置类,用于绑定外部配置(properties和YAML)到Java对象的的一种机制;
@Data
@ConfigurationProperties(GlobalProperties.PREFIX)
public class GlobalProperties {
    /**
     * 默认前缀
     */
    public static final String PREFIX = "encryption.type";
    /**
     * 加解密算法
     */
    private String algorithmType;

    /**
     * 加解密key值
     */
    private String key;
}
注解修改:
@Target(ElementType.METHOD)
@Retention(RetentionPolicy.RUNTIME)
public @interface SecuritySupport {
    /**
     * 项目默认加解密实现类encryAdecryImpl
     * */
    String securityHandler() default "encryAdecryImpl";

}
重写Starter默认的加解密方式:
@Slf4j
@Component
public class EncryAdecryImpl implements SecurityHandler {

    @Resource
    private GlobalProperties globalProperties;
    private static volatile SM2 sm2;

    @Override
    public String encrypt(String original) {
        log.info("【starter】具体加密的数据{}",original);
        return sm2.encryptBase64(original, KeyType.PublicKey);
    }

    @Override
    public String decrypt(String original) {
        String decryptData = StrUtil.utf8Str(sm2.decryptStr(original, KeyType.PrivateKey));
        log.info("【starter】具体解密的数据:{}",decryptData);
        return decryptData;
    }

    @PostConstruct
    @Override
    public void init() {
        log.info("======>获取映射的加密算法类型:{}",globalProperties.getAlgorithmType());
        //传的是加密算法
        KeyPair pair = SecureUtil.generateKeyPair(globalProperties.getAlgorithmType());
        byte[] privateKey = pair.getPrivate().getEncoded();
        byte[] publicKey = pair.getPublic().getEncoded();
        sm2= SmUtil.sm2(privateKey, publicKey);
    }
}


